Tutorial 3: Merging Radiometric Grids
This tutorial steps through the required processes to merge 16 radiometric grids (potassium) from the western part of New South Wales, Australia. Where processes take a significant amount of time to execute, I've included an approximate time in parenthesis at the end of each step. The processing times are for a 3.6 GHz CPU with 8 cores.
If you encounter errors during the processing, then view the System Log File – File|View System Log File.
Processing Steps
- Run GridMerge – double-click the GridMerge desktop icon. Take a moment to familiarise yourself with the main window. You will notice that almost all the sub-menus off the menu bar are not enabled. These will be enabled once the Working Directory and Aliases and Parameters are set. We first set the Working Directory, then Check the Grids if this has not yet been done. Finally, we have to generate a Grid Priority Order, as a Priority Order File is required by some of the processes. We will then work through the requires processes under the Grid Pre-Conditioning, Grid Levelling and Grid Merge menus.
- Set the Working Directory – File|Set Working Directory. Navigate to the "nsw_potassium" folder and click the Select Folder button. A message will be displayed in the Messages list box showing the Working Directory set. The Utilities menu items are now enabled.
- Check Grid Parameters – Utilities|Check Grid Parameters. On the Check Grids window use the File Icon buttons to select/specify the Input Grid Directory as "GRIDS_ORIGINAL" and the Report File as "report.txt". The Report File will be created if it doesn't exist. Click the Run button. On completion of the task, load the report file into a text editor to view the output. All grids should share the same projection and datum, have have rotation=0.
- Create a Priority Order File – Utilities|Generate Priority Order. On the Generate Grid Priority Order window use the File Icon buttons to select/specify the Input Grid Directory as "GRIDS_ORIGINAL" and the Priority Order File as "priorityOrder.txt". The Priority Order File will be created if it doesn't exist. Click the Run button. On completion, you can view the grid Priority Order File in a text editor.
- Set Aliases and Parameters – Set Aliases And Parameterse|Set Aliases and Parameters. On the Set Aliases And Parameters window, click the Load From File button, then select the control file "gridMerge_aliases_and_params.pc" from the Working Directory.
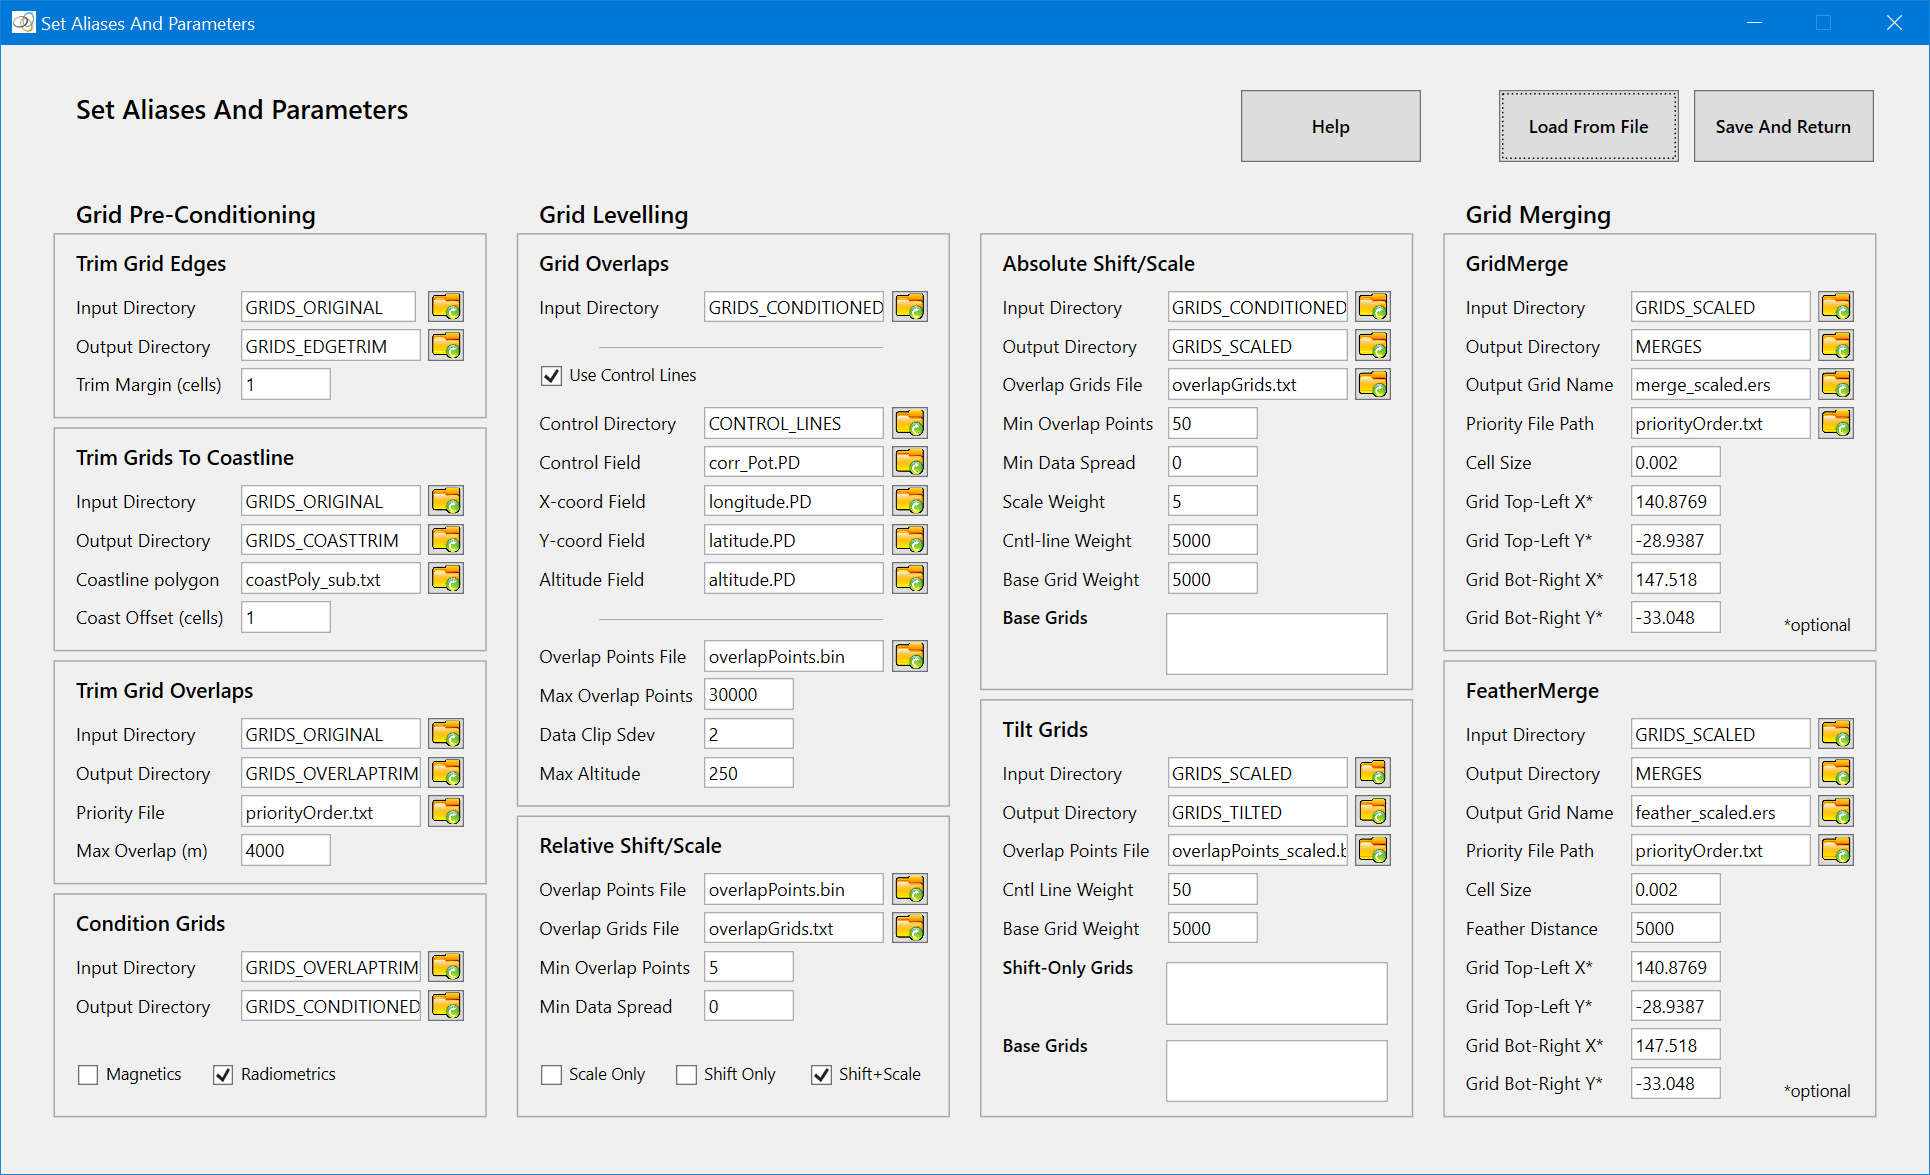
Take a moment to study the aliases and parameters in the Set Aliases And Parameters window. The aliases and parameters are ordered by process – and in the order (top to bottom, left to right) that the processes are usually executed. You do not need to set all the aliases and parameters – only those for the processes we are going to run. In this tutorial we are going to skip Trim Grids to Coastline and Tilt Grids. Notice how any process that modifies the grids reads from an input directory and outputs to a different directory – i.e. grids are not updated. Note too how the output directory for one process becomes the input directory for the next process.
- Trim Grid Edges – Grid Pre-Conditioning|Trim Grid Edges. The process is launched. Grids are read from GRIDS_ORIGINAL, trimmed by 5 cells, and written to GRIDS_EDGETRIM. See the results in the User Log File. (13 seconds)
- Trim Grid Overlaps – Grid Pre-Conditioning|Trim Grid Overlaps. The process is launched. Grids are read from GRIDS_EDGETRIM and written to GRIDS_OVERLAPTRIM. Using the Priority Order File specified, the grids are trimmed according to priority – lower priority grids are preferentially trimmed. (18 minutes)
- Condition Grids – Grid Pre-Conditioning|Condition Magnetic Grids. The process is launched. Grids are read from GRIDS_OVERLAPTRIM, conditioned (to mean=0) and written to GRIDS_CONDITIONED. (11 seconds)
- Get Grid Overlaps – Grid Levelling|Get Overlaps. The process is launched. Grids are read from GRIDS_CONDITIONED, overlaps are calculated, and the overlap information is written to the binary file "overlapPoints.bin". We are using control lines, which are read from the Intrepid database "CONTROL_LINES". The x and y coordinates of the control lines must be the same projection and datum as the grids. (1 minute, 16 seconds)
If, after trimming, a grid is all nulls, then it is deleted from the output directory and a warning message is displayed in the Messages list box.This means that you will have to create a new Priority Order for use with Get AbsoluteShift/Scale And Apply or Merge Grids/Feather And Merge Grids, as there must be a one-to-one relationship between the Priority Order and grids in a directory. It is also a good idea after trimming the overlaps to use the Create Jpegs From Grids utility to generate jpegs and identify which grids may require further editing. Use Boundary View (run on the overlap-trimmed grids) to see which portions of a particular grid are likely to contribute to the final merge. Then use Sub-Section a Grid to remove unwanted sections.
- Get Relative Shift/Scales – Grid Levelling|Get Relative Shift/Scales. The process is launched. The grid overlaps are read from "overlapPoints.bin" and the best shift for each grid pair is written to the Overlap Grids File "overlapGrids.txt". (6 minutes)
- Get Absolute Shift/Scales – Grid Levelling|Get Absolute Shift/Scales And Apply. The process is launched. The best shift for each grid pair are read from the Overlap Grids File "overlapGrids.txt". The absolute shift for each grid is calculated and applied to the grids read from GRIDS_CONDITIONED, and the adjusted grids are written to GRIDS_SCALED. We are using control lines as the datum (specified in step 9), so there is no need to specify a base grid (30 seconds).
- Merge the Grids – Grid Merge|Merge Grids. The process is launched. The grids in the GRIDS_SCALED directory are merged. The output grid "merge_shifted.ers" is written to the MERGES directory. (10 seconds)
- Feather and Merge the Grids – Grid Merge|Feather And Merge Grids. The process is launched. The grids in the GRIDS_SCALED directory are feathered and merged. The output grid "feather_scaled.ers" is written to the MERGES directory. (5 minutes)
Take time to view the User Log File – File|View User Log File.
Viewing the merged grids
- Load LHS panel grid – click the File Icon button to the left of the LHS grid text box to launch a Open File dialogue. Navigate to and select "merge_scaled.ers" from the MERGES directory. While this is loading, load a grid into the RHS panel as per step 2 below.
- Load RHS panel grid – click the File Icon button to the left of the RHS grid text box to launch a Open File dialogue. Navigate to and select "feather_scaled.ers" from the MERGES directory.
Use the Pan and Zoom to compare the 2 grids.
Tilting Grids
The grids in this collection have merged quite well, but they may benefit further from tilting. If radiometric grids are tilted, then it is a good idea to redo steps 9-13, but this time starting with the scaled grids (GRIDS_SCALED). By iterating through the shift/scale cycle again, improved fits are usually obtained. So let's tilt the grids:
- Get Grid Overlaps – First open the Set Aliases and Parameters window. Change the Input Directory for Grid Overlaps to "GRIDS_SCALED". That is, we are going to use the differences between the shifted/scaled grids as input to the tilting. Change the Overlap Points File to "overlapPoints_scaled.bin". Click the Save And Return button to save the changes and exit the window. Now get the overlaps again – Grid Levelling|Get Overlaps to launch the Get Overlaps process.
- Tilt The Grids – First open the Set Aliases and Parameters window. In the Tilt Grids section, set the Input Directory to "GRIDS_SCALED", the Output Directory to "GRIDS_TILTED", and the Overlap Points File to "overlapPoints_scaled.bin". Click the Save And Return button to save the changes and exit the window. Now tilt the grids – Grid Levelling|Get Grid Tilts And Apply. The process is launched. The grid overlaps are read from "overlapPoints_scaled.bin" and the tilted grids are written to "GRIDS_TILTED".
Merge the tilted grids (call the output "merge_tilted", say) and compare to "merge_scaled".
Using Conditioned Base Grids
The final merged grids are at the same level (datum) as the control lines or base grid – whichever was used. If the base grid was conditioned prior to levelling, then the final merge will be level to this conditioned grid's level. In this case, there are two options for getting the merged grid to the correct level:
- Don't condition the base grid. Or after conditioning all grids, overwrite (using copy/paste) the base grid with the corresponding unconditioned grid from the input directory.
- Run statistics on all the grids in the input directory prior to conditioning (Utilities|Grid Statistics). Then, after merging, scale the merged grid by the base grid's standard deviation (radiometrics only) and add the base grid's mean (Utilities|Shift/Scale A Grid). For magnetic grids, use a scaling value of 1, as the conditioning does not scale the data. This will bring the merged grid to the same level as the base grid.